The common question I ask all my clients attending golf schools Orlando is, “How many putts do they make that come up short of the hole?” The answers I receive continue to astonish. Answers can range from “20%” to “some” and some golfers answer that “all” their putts that come up short of the hole go in. Anytime I receive that answer, I ask the client to pack a bag and go play pro-ams with me. We’re sure to win every time we play. They may not know a thing about putting distance control with their answer. But being able to show me they can make putts, under pressure in a tournament, that come up short of the hole, is worth the price of admission.
The simple fact is you make zero putts that come up short of the whole. Let’s explore how you can increase the probability of you making more putts by creating better putting distance control.
How do you control putting distance?
Before you can understand how to control your distance, you must understand a more important yet simpler priority of putting. Hitting the middle of your putter every time you stroke it. If you can’t hit the middle of your putter, then controlling the distance of your putts is going to be inconsistent at best. There are various ways of controlling your ability to hit the sweet spot of your putter. I happen to like two different methods.

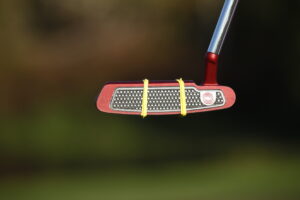
Highlighting the Sweet Spot of the Putter with 2 Rubber Bands is an Effective Drill to control the face of the putter and feel what solid putting should feel like.
The first method is to highlight the sweet spot of your putter. You can buy commercial swing aids to do this. But you can also do it simply by wrapping two rubber bands around your putter head. Use 2 rubber bands with space in between each to highlight the middle of your putter. As you putt, if you don’t hit the sweet spot, you’ll feel the ball strike the rubber band instead. As you master this drill, you can start squeezing the rubber bands together to form a smaller sweet spot area. The smaller the sweet spot area, the more control you’ll have over your distances.
Another method I like to teach sweet spot control is to putt a ball the entire length of a yard stick. Placing a ball at one end of a yard stick can you putt the ball and have the ball remain on the stick all 36 inches. This method goes beyond the rubber bands by not only ensuring you hit the sweet spot. It also ensures that you’re keeping your face square out of dress as well as at impact. You can hit the sweet spot with the rubber bands that still start your putt offline. Putting down a yardstick helps cure both sweet spot ailments as well as your ability to control the opening and closing of the putter face.
But what about controlling the distance of each putt?
As you gain control of hitting the sweet spot of your putter, you’re most likely start seeing trends in your distance of each putt. You’ll probably find that you’re more comfortable with certain distances. And very uncomfortable with other distances. This is most likely due to the length of the first putt you typically hit on the golf course. As well as the length of putt you face putting for par or bogey when you miss the green. Being faced with those distances on a regular basis, you ingrain the tempo of your putting stroke that’s repeatable as well as consistent. To control distances of any length, it’s the tempo of your putting that will play the most important role.
Controlling distance is like climbing a ladder
A very common putting distance control drill is the Ladder Drill. The best golf schools in Florida, including myself, prescribe this drill frequently. By simply placing tees on the green equal lengths apart, it’s easy to start practicing your distance control putting. Start at one end of the line of tees. Putt a ball to each tee in the line. Putting to each tee randomizes your practice. While at the same time challenging the tempo of your putting stroke to gain control over the varied length of putts you’re facing.

Creating a Ladder Drill to any hole, or event the fringe of the green, can provide you the necessary feel to control your putting distances.
After hitting each tee, start again from the opposite side of the tees. Most likely as you set up the ladder, you set it up on a hill. Why not utilize both sides of the hill to gain control of your putting distance? And the hill most likely will affect the curvature of the putt. So why not experience the curvature in the opposite direction? By going to the opposite end of the ladder, you’re now faced with the opposite putting conditions. It’s not enough to just learn putting up a hill or in one curvature direction. To control the distance you hit each putt, you must familiarize yourself with all compass points of any whole.
How do I take putting distance control to the course?
It’s going to take multiple attempts over the course of many days to gain an understanding of your putting tempo using the ladder drill. But you can use the ladder drill as you warm up to play. All too often when faced with being rushed to the tee box, we fail to gain an understanding of the speed of the greens you’ll play. Why not set up one tee at the edge of the green and the first cut? And hit multiple putts to tee from varying distances? Doing so allows you to understand green speed for any golf course, any day you play. If you’re not willing to stop at the practice screen to gauge green speed, you’ll never be able to transfer the skills you’re ingraining with the ladder drill to the golf course.
Fine tuning distance control
As you gain a better understanding of controlling your distances it’s now very important that you become conservative in your directional choices of putts that allows each putt to make it to the hole. There are many ways to accomplish this. But the bottom line is simple. Any ball that rolls in front of or comes up short of the hole had no opportunity to gain entrance to the hole.
A common drill seen executed at any stop along the PGA Tour is the safety zone drill. Whether it’s a practice green flag stick, an alignment rod, or another club, having an object approximately 10 to 12 inches past the hole provides you an area that is “safe” should your putt miss the hole but roll the proper distance. The objective of this drill accuracy and distance control. If you miss to the right or left of a hole, you’re rewarded with the knowledge you hit the putt with the proper speed.
Challenging you’re putting distance control
Arguably, the best way to take your putting distance control to the golf course is by practicing. Practicing your distance control putting skills under circumstantial conditions. Whether it’s playing for a couple dollars with your friends, or keeping score with yourself, it’s vital that your distance control holds up under the tightest pressure conditions. Practicing under these conditions will ultimately showcase better skills. While at the same time identifying any flaws you still have. The flaws are the culprits on the golf course preventing you from controlling your distance while putting.
Conclusion
As one of the best golf schools in Florida, we always set out to improve the putting skills of all our clients. But when each client goes home, it’s their responsibility to challenge these skills, particular putting distance control skills, under pressure. Let’s make sure that when someone asks you the same question I did earlier in the blog you can answer with authority. You don’t make putts that come up short of the hole. But you do make a lot of putts when you have a chance to understand green speed. In turn, allowing you to control the distance each putt rolls.

